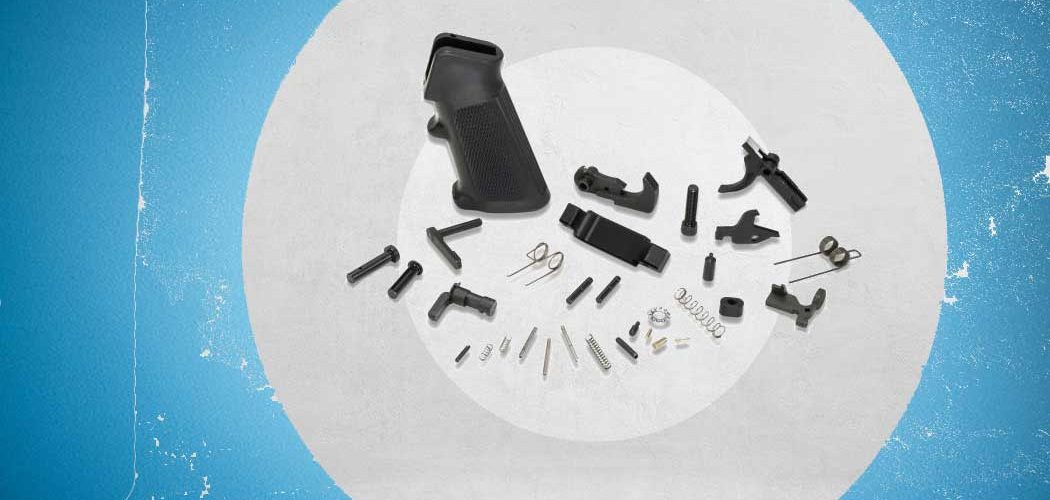
Our AR-15 lower parts kit features KAK Industry produced parts throughout. It includes a mil-spec trigger group, billet trigger guard, standard A2 handle, and mil-spec springs. Each 100% made in the USA. This kit is one of the best lower parts kit in the industry.

AR-15 Complete Lower Parts Kit Assembly
An overview of steps necessary to build your complete lower parts kit:
STEP 1: Assemble Trigger & Trigger Spring
Assemble the trigger and trigger spring by first ensuring the metal wire connecting both coils of the spring rest underneath the sear (the front, flat part of the trigger). Slide the first coil of the spring over the trigger pin hole, and then repeat on the opposite side for second coil.


STEP 2: Install Disconnector Spring
Pull the disconnector spring from your AR-15 complete lower parts kit. The disconnector spring and the bolt catch plunger spring are very similar which makes it harder for you to identify. As a tip, the disconnector spring has a flared base on the bottom end on the spring.
The flared base is to go in the cutout of the trigger. Hold the trigger vertically and insert the flared base of the spring into the cutout hole of the trigger. It will be a tight fit, so apply some pressure to ensure the bottom of the spring is fully seated. Some recommend using a 3/32″ pin punch tool to gently push the spring down but we did not find this necessary.


STEP 3: Assemble Hammer & Hammer Spring
Hold the hammer so that the hammer pin holes are on top and you can see each stud on left and right. The tip of the hammer should be facing you. In the other hand, hold the hammer spring so that the coils are pointing away from you. Angle the stud toward the left coil while pulling the right coil away to make room. Once the left stud is in place you should easily be able to rotate the right stud so that it is inserted into the right coil. Compare your result to the step three image below.


STEP 4: Install Trigger & Disconnector
You will need the complete trigger assembly as seen in step 2 along with the disconnector and trigger pin. Please note that the trigger pin and the hammer pin are the exact same pins, either one will work. Place the disconnector into the cavity of the complete trigger assembly so that the holes line up on either side. The disconnector notch should rest on top of the disconnector spring, see image below.
Lubricate the trigger pin hole with lubricating gun oil. Place the trigger and disconnector assembly into the lower receiver. Gently press down on the trigger and disconnector assembly until you see all the trigger pin holes line up in the side of the lower receiver. Insert the trigger pin while the holes are lined up perfectly. The pin should be inserted into either side of the receiver with the grooves on the trigger pin going in first.
Use the gunsmithing hammer to gently tap the trigger pin in place. Continue tapping the trigger pin until it’s flush with both sides of the receiver. Double check the trigger and disconnector assembly inside the fire control cavity. The ends of the trigger spring should rest on the floor of the fire control cavity. And make sure both trigger spring coils are still in place around the studs of the trigger pin holes.


STEP 5: Install Hammer & Hammer Pin
Lubricate the hammer pin hole with lubricating gun oil. Hold the hammer and hammer spring assembly as shown in step 3 image below. Gently squeeze the legs of the hammer spring and drop, legs of spring first, into the fire control cavity. Start to bend legs so that they lay to the right closest to the magazine button cavity while you pull the hammer to the left. The hammer spring legs should rest atop the studs towards the outside of the trigger coils. The studs and coil springs of the hammer should line up on either side of the hammer pin holes of the lower receiver.
Insert the hammer pin while the holes are lined up perfectly. The pin should be inserted into either side of the receiver with the grooves on the hammer pin going in first.
Use the gunsmithing hammer to gently tap the hammer pin in place. Continue tapping the hammer pin until it’s flush with both sides of the receiver.


STEP 6: Install Trigger Guard
You can skip this step if you are working with a KAK Industry billet lower receiver. For forged lower receivers install the trigger guard. Find the roll pin hole on the trigger guard. It is the largest of the holes and is not threaded. Align the trigger guard’s rear pin hole with the two holes on the lower receiver on side closest to the trigger.
Because the roll pin is a very tight fit, use the lubricating gun oil and gunsmithing hammer to gently tap the roll pin into place. You may need to use the 3/32″ punch in addition to the hammer to make sure the pin is in place and flush on both sides. The rubber part of the needle nose pliers may be used to place under the holes of the lower receiver to reduce the risk of bending or breaking the lower receiver.
Next align the other side of the trigger guard with that of the lower receiver. Start screwing in the set screw. To finish screwing in the set screw us an allen wrench or hex key until the screw is flush on the other end of the hole on the lower receiver.


STEP 7: Install Magazine Catch & Magazine Release
Take the magazine catch and insert the threaded portion through the magazine hole in the left side of the receiver. The threaded portion should stick through the other side of the receiver to install the magazine catch spring and magazine release button.
With your thumb holding down the magazine catch install the magazine catch spring. This spring is the widest of all springs in the kit with the fewest coils. Next, thread the magazine release button onto the magazine catch while still holding it down with your thumb.
You will need to thread the button until it’s just about flush with the hole in the receiver. It may help to apply some lubricating gun oil to both the magazine release button and threads. It may help to install the button with the 5/32″ punch. You can use an empty magazine to test the magazine catch and magazine release button to make sure it functions.


STEP 8: Install Bolt Catch
Collect the following items out of the complete lower parts kit: bolt catch lever, bolt catch plunger spring, bolt catch plunger, and bolt catch roll pin. It is recommended you use masking tape on the receiver around the bolt catch mount and roll pin holes. This will potentially prevent the risk of damaging and/or scratching the anodized finish on the receiver.
It is recommended to use lubricating gun oil on the bolt catch lever, bolt catch spring, and bolt catch roll pin holes. Insert the spring into the bolt catch hole. Next, insert the plunger atop the spring.
Get the bolt catch roll pin “started”, by partially inserting the roll pin inside the bolt catch roll pin hole. Use the gunsmithing hammer to gently tap it inside the hole BUT stop just before it goes through the first side to allow the bolt catch lever to be inserted. Now, insert the bolt catch so it’s resting atop the plunger.
You will need to apply some pressure to align the holes. Once the holes are aligned, continue tapping the roll pin into place until it is inserted on both sides. Once installed, the pin should be just slightly recessed inside each hole. It will be necessary to use KAK Industry’s bolt catch roll pin starter punch and the walts finish tool to get to the pin recessed inside.


STEP 9: Install Front Pivot Pin
For step nine, you’ll need the front pivot pin, pivot pin detent, and pivot detent spring. Take the detent spring and place it into the pivot pin detent hole. The pivot detent spring is the same as the takedown detent spring; the thicker one is the safety detent spring which will not fit in the pivot pin detent hole.
Next, grab the pivot pin detent; it is the same as the takedown pin detent. It is recommended that you use pliers to insert the pivot pin detent atop the spring. The pin will need to be compressed down into the hole. You can use a dull razor blade or knife to hold down the pivot pin detent and keep it compressed. The spring and pin detent will need to remain compressed while inserting the front pivot pin.
As the parts are kept compressed, insert the front pivot pin into its mounting hole with the channel of the pin facing towards the detent pin. Use lubricating gun oil to help with the tight fit. The blade or knife can be removed once the detent pin has reached the channel of the front pivot pin. The detent pin will lock into the channel. Keep inserting the front pivot pin into the receiver’s mounting holes and until it fully seated in place.


STEP 10: Install Safety Selector & Pistol Grip
Collect the following parts: safety selector lever, safety detent pin, safety detent spring, pistol grip, hex bolt screw, and lock washer from the complete lower parts kit. The safety selector lever and pistol grip will need to be installed together to help retain the safety detent spring and detent pin. Start by using the lubricating gun oil and lubricate the safety pin hole. Then, insert the safety selector lever through the hole.
Next, you will need to flip the lower receiver upside down to insert the safety detent pin into the detent hole, pointed end first. The detent hole is located right above the safety selector lever hole. It is the closest hole to the safety selector lever hole when the lower receiver is flipped upside down.
Now insert the safety detent spring into the hole located on top of the pistol grip. Begin to install the pistol grip onto its mount. You will need to make sure the detent spring aligns with the safety detent pin.
Once the pistol grip is seated on to the lower receiver make sure the bolt hole and grip hole are aligned, insert the hex bolt screw and washer. You can use a 3/16″ Allen key to tighten until “hand-tight” and secure the pistol grip.


STEP 11: Install Rear Takedown Pin
For this step, you’ll need to pull the rear takedown pin and takedown pin detent. Use lubricating fun oil to lubricate the takedown pin and insert it into the pin hole in the right side of the lower receiver. On the back of the lower receiver insert the takedown pin detent into the small hole located next to the latch plate mount. You will find this hole just below the buffer tube housing.


STEP 12: Install Buffer Tube & Buffer Retainer
Collect the following parts: takedown detent spring, buffer tube, castle nut, latch plate, buffer retainer, and buffer retainer spring. You will find the buffer tube, castle nut, and latch plate in the M4 carbine stock assembly kit. You will also need KAK Industry’s castle nut multi tool.
Start by inserting the rear takedown detent spring atop the takedown pin detent in the same hole as step eleven. Then retrieve the buffer tube and install the castle nut onto the threads. Make sure to thread the nut to the end of the threads. The crown of the castle nut should be facing the rear of the buffer tube. Next, grab the latch plate and slide it onto the threads behind the castle nut.
Thread the buffer tube into the housing of the buffer tube assembly. The latch plate should touch the rear takedown detent spring. Grab the buffer retainer and buffer retainer spring. The buffer retainer spring will need to be inserted into the hole of the buffer tube housing’s threads.
Next, insert the buffer retainer atop the spring. You will need to compress it with the 5/32″ roll pin punch. With the compression applied to the buffer retainer, thread the buffer tube into place until it meets the buffer retainer.
Make sure the lip of the buffer tubes rests on the retainer. It should be next to the protruding nipple located on the middle of the retainer. This will make sure the buffer and buffer and the buffer retainer spring are properly seated once your rifle or pistol is assembled.
Make sure the takedown detent spring is resting in its hole. You will need to compress the spring by pressing the latch plate on top of it. Keep gently compressing on the latch plate until it is flush with the backside of the buffer tube housing. At this time, you can then thread the castle nut up against the latch plate, make sure it is flush. Once flush, slide your castle nut multi tool over the castle nut and tighten the castle nut.


To continue with your build be sure to check out our article how to build an AR-15.
#kakbuild #askkak #builtnotbought #doityourself
Add comment