Thank you for your interest in our KAK Industry free float handguards. These handguards are intended for use on mil-spec style upper receivers. Installation on certain billet or non-standard upper receivers may require modification of the handguard or receiver. Please note that modifying the handguard will void any warranty. Please follow the instructions below to ensure the safest and most reliable installation of your new handguard.

-
1Ensure that the upper receiver is free of any defects or damage to the threads.
- Tighten the barrel nut to 35 foot pounds.
- Loosen the barrel nut.
- Tighten the barrel nut to 35 foot pounds.
- Loosen the barrel nut.
- Tighten the barrel nut to 35 foot pounds.
- Tighten the barrel nut one final time to 35-55 foot pounds.
- Place the clamp on each side of the barrel nut.
- Apply a small amount of medium strength thread locker to each cap screw.
- Thread the two screws into the clamps from the side with the larger diameter hole.
- Alternatly tighten the two screws until they both reach 45 inch pounds. Check each screw to confirm the proper torque.
2Apply an anti-seize compound such as Aeroshell 64 to the threading on the receiver.
3Insert the barrel into the upper receiver. Ensure that the barrel index pin is fully seated in the index pin slot and that the barrel is seated in the upper so that the lip of the receiver is touching the lip of the barrel extension.
4Keeping the barrel in the receiver, thread the barrel nut that was included with the handguard onto the upper receiver. Be sure not to cross thread and seat the barrel nut firmly with hand pressure.
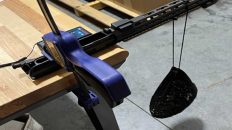
5Install the upper receiver into a quality fixture that prevents excessive torque on either the upper receiver or the barrel.
6Using a torque wrench and either the supplied wrench or a standard castle nut barrel wrench, tighten the barrel nut using the following procedure:
7Install gas block assembly and any other accessories that may be covered by the handguard.
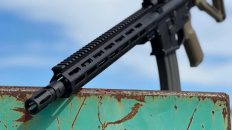
8Slide the handguard over the barrel nut allowing the index tabs to fit on each side of the upper receiver. To fit some bulkier billet upper receivers, these tabs may need to be modified or removed. This will void any warranty and the part will not be returnable.
9The handguard installs with two aluminum clamps. These clamps can be inserted from either side. Tightening these clamps pulls the handguard down into the barrel nut ensuring that it will not move and that the top rail stays level. Install the clamps using the following procedure:
Click here for a “printable” free float handguard installation guide.

What brake do you recommend for kak-243-19-inch-rifle-melonite-barrel
Thanks Mark
Hi Mark. Anything 5/8-24 will fit, just depends on your preference. This brake will help with recoil.
How far out will the 13″ hand guard fit with the 5.56 12.5″ barrel ?
I would think 1/2″ over but not 100% sure beings the barrel fits into the upper.. any photos ?
Thank you.
Hi Michael. You are correct. The handguard would stick out about 1/2″ from the end of the barrel.
Will the free float AR/10 handguard fit a high profile DPMS upper receiver?
Yes
I have a AR15-HG-Kit-MLOK-15 handguard. I was planning on installing it on my DPMS panther arms rifle. Do I need to change out the gesture and block to make everything fit?
Do you mean the gas block and gas tube?
All the KAK handguards use the same barrel nur correct?
Hi Austin,
Yes, all KAK Industry AR-15 handguards use the same barrel nut, making them interchangeable across our handguard models. Let me know if you need any further details!
hi
1. does any handguard came with all parts like nut and pins and wedge?
2. do I need to time it with shims?
Hi Naixian,
1. Yes, all KAK Industry handguards come with the necessary hardware, including the barrel nut and fastening components.
2. No, our barrel nuts do not require timing with shims. The twin lug fastening system ensures a secure fit without the need for additional shims. Just follow the torque specifications in the installation guide for a proper setup.
I just got my 15” handguard today. I removed the cross bolts but I can’t remove the wedges nor the barrel nut which is stuck inside the handguard. I also tried screwing the handguard over the threads of the upper and pulling on it but still no luck (I didn’t pull on it too hard in case something was locking it in). Is there something in particular you have to do to get the barrel nut out of the handguard?
Thanks
Never mind, I got it out by screwing both screws in slightly then gently pushing on them to pop one of the wedges out. Once one was out I was able to tap the other one out then the barrel nut came out easily.
Hi JP, Thanks for the update! Glad you were able to get it sorted out. Let me know if you have any other questions or need further assistance.
Just to confirm, are the barrel nut torque specs for your AR10 handguards are the same as for your AR15 handguards (35-55 ft/lbs)?
The launcher rail is an absolute unit of a handguard. I really hope this receives different lengths because I have multiple projects that I’d love to use one on, starting with a mid length 14.5 FSB upper.